Unleashing the Magic: How to Create Enchanting Mickey Rice Krispies Treats at Home
Step into a world of culinary enchantment where your favorite crispy, chewy treats meet the iconic charm of Mickey Mouse! Whether you’re dreaming of a Disney vacation, planning a themed party, or simply want to bring a sprinkle of magic into your kitchen, making
mickey rice krispies treats at home is a delightful and surprisingly simple endeavor. These beloved snacks, famous in Disney parks worldwide, can be recreated with ease, bringing smiles and delicious memories without the need for a plane ticket.
This comprehensive guide will walk you through every step, from mastering the perfect Rice Krispies treat base to shaping, dipping, and decorating your Mickey-shaped masterpieces. Prepare to impress your family and friends with treats that look and taste like they came straight from the Happiest Place on Earth!
Crafting the Magical Base: The Perfect Rice Krispies Treat Recipe
The foundation of any spectacular
mickey rice krispies treats is, of course, a perfectly executed batch of the classic Rice Krispies treats. While incredibly simple, a few key tips can elevate your base from good to absolutely fantastic.
Ingredients You'll Need:
- 3 tablespoons unsalted butter
- 1 (10-ounce) package of mini marshmallows (or about 4 cups regular marshmallows)
- 6 cups Rice Krispies cereal
- A pinch of salt (optional, but enhances flavor)
Step-by-Step Instructions:
- Prepare Your Pan: Grease a 9x13-inch baking pan with butter or cooking spray, or line it with parchment paper for easy removal. This is crucial for preventing sticking.
- Melt the Butter: In a large pot or Dutch oven, melt the butter over low heat. Low heat is essential to prevent the butter from browning too quickly, which can affect the final flavor.
- Add Marshmallows: Once the butter is fully melted, add the marshmallows to the pot. Stir constantly until the marshmallows are completely melted and smooth. Remove the pot from the heat as soon as they are fully incorporated to prevent them from becoming too hard later.
- Stir in Cereal: Gently fold in the Rice Krispies cereal until it is evenly coated with the marshmallow mixture. If you're using a pinch of salt, add it now. Be careful not to crush the cereal too much; we want those satisfying crispy textures!
- Press into Pan: Transfer the mixture to your prepared baking pan. Using a buttered spatula, a piece of waxed paper, or slightly damp hands, gently press the mixture evenly into the pan. Avoid pressing too firmly, as this can result in hard, dense treats. A light, even pressure is all that's needed for that ideal chewy consistency.
For even more foundational tips and variations on the classic treat, you might find inspiration in
mickey rice krispies treats - Article 1.
Shaping the Icon: Tips for Perfect Mickey Mouse Treats
Now for the fun part: transforming your delicious base into instantly recognizable Mickey Mouse shapes! This step requires a specific tool and a bit of quick work.
Essential Tools:
- Mickey Mouse cookie cutter (various sizes available, but a medium 3-4 inch size is ideal)
- Waxed paper or parchment paper
- Cooking spray (your best friend in this process!)
The Key to Success: Timing and Technique
The absolute most important tip for cutting perfect
mickey rice krispies treats is to do so
while the treats are still warm. As the treats cool, they firm up and become prone to cracking and crumbling when cut. You'll need to work with a bit of speed to get all your shapes cut before they set too much.
- Prepare Your Cutter: Lightly spray your Mickey Mouse cookie cutter with cooking spray. You may need to re-spray it periodically to prevent sticking.
- Cut While Warm: Once your Rice Krispies treat mixture has been pressed into the pan and is still warm (but cool enough to handle), begin cutting. Press the cookie cutter firmly into the treats.
- Release the Shape: Gently lift the cookie cutter with the treat still inside it. Use your fingers to gently push the treat out of the cutter onto a piece of waxed paper or parchment paper.
- Minimize Waste (No Scraps!): You'll inevitably have scraps of treats left between your cutouts. Don't discard them! Gather these warm scraps and firmly squish them back into any uncut areas of the pan. Then, press them down and continue cutting new Mickey shapes. Repeat this process until you can no longer cut a full shape. This method ensures virtually no waste and maximizes your yield of delightful mickey rice krispies treats.
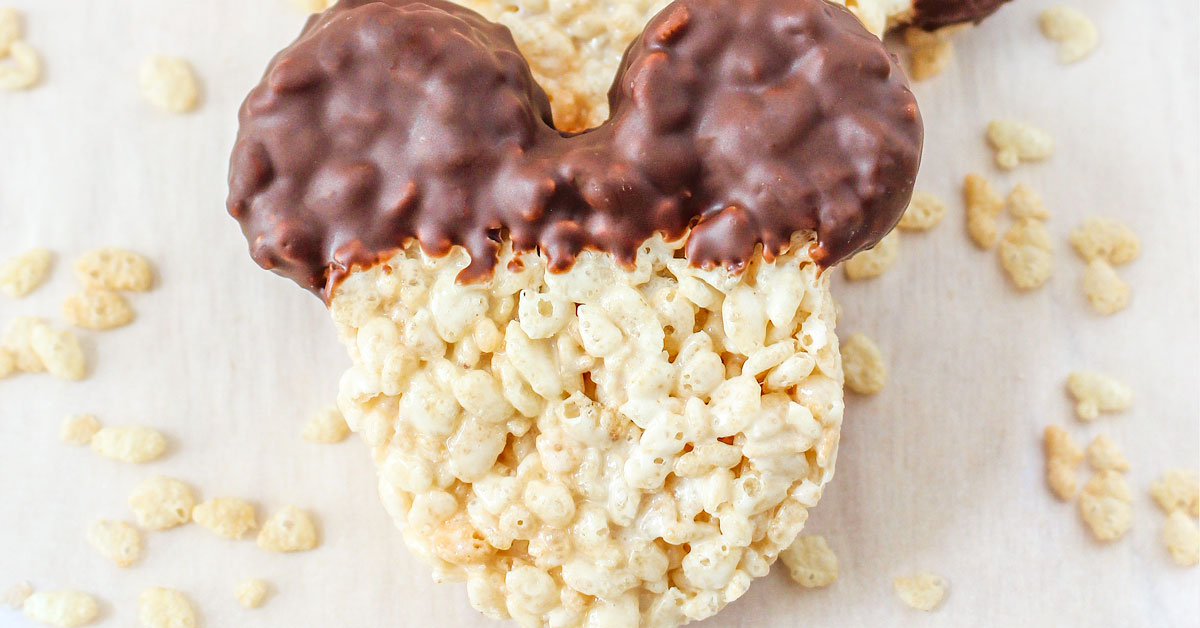
Dipping and Decorating: Adding That Disney Sparkle
The final touch for truly magical
mickey rice krispies treats is the dipping and decorating. This is where you can let your creativity shine and make each treat uniquely enchanting.
Choosing Your Dipping Chocolate:
For best results, avoid regular chocolate chips for dipping. While delicious for baking, they don't melt as smoothly and can seize or bloom easily, leading to a dull or streaky finish. Instead, opt for:
- Chocolate melting wafers or candy melts: These are specifically formulated for melting and dipping, offering a smooth, glossy finish and easy workability.
- Paramount crystals: While not strictly necessary for this recipe, paramount crystals are a secret weapon for working with chocolate. A small amount added to melted chocolate (especially if you're using high-quality chocolate for dipping) helps to thin it slightly, improve its flow, and prevent sugar or fat bloom, resulting in a more professional and stable coating.
Melting Your Chocolate:
Whether using a double boiler or a microwave, melt your chocolate slowly and carefully.
- Microwave Method: Place melting wafers in a microwave-safe bowl. Microwave on 50% power in 30-second intervals, stirring thoroughly after each interval, until smooth. Be patient and avoid overheating to prevent burning or seizing.
- Double Boiler Method: Place chocolate in a heatproof bowl set over a pot of simmering water (ensure the bowl doesn't touch the water). Stir gently until smooth and melted.
Dipping and Decorating Techniques:
- Prepare Your Workspace: Lay out a fresh sheet of waxed paper or parchment paper for the dipped treats to set on.
- Optional: Popsicle Sticks: For an authentic Disney park experience and easier handling, insert a popsicle stick into the base of each Mickey-shaped treat before dipping. This also helps prevent messy fingers!
- The Dip: Hold a Mickey treat by the non-dipped side or the popsicle stick. Dip it into the melted chocolate, coating about half to two-thirds of the treat. Gently tap off any excess chocolate against the side of the bowl.
- Add Sprinkles: Immediately after dipping, while the chocolate is still wet, sprinkle with your favorite Disney-themed sprinkles, colorful jimmies, edible glitter, or even a contrasting drizzle of another melted candy color. The possibilities are endless!
- Set and Harden: Place the decorated treats on your prepared waxed paper. Allow them to set completely at room temperature or, for quicker results, place them in the refrigerator for 10-15 minutes.
For more advanced decorating ideas and chocolate-handling tips, explore
mickey rice krispies treats - Article 3.
Storing, Serving, and Spreading the Joy
Once your delightful
mickey rice krispies treats are complete, you'll want to ensure they stay fresh and are presented beautifully.
Storage:
These treats are best enjoyed fresh, when they are at their chewiest and softest. When stored in an airtight container in the refrigerator, they can last up to 7 days. You might notice they get a little firmer over time, but they remain perfectly edible and delicious! For optimal texture, allow them to come to room temperature for a few minutes before serving.
Serving Suggestions:
Mickey Rice Krispies treats are perfect for a multitude of occasions:
- Themed Parties: An obvious choice for Disney-themed birthdays or celebrations.
- Movie Nights: Enjoy them while watching your favorite Disney classics.
- Lunchbox Treats: A magical surprise for school lunches.
- Homemade Gifts: Individually wrap them in clear cellophane bags with a ribbon for charming party favors or hostess gifts.
- Disney Countdown: A fun way to get excited for an upcoming trip to the parks!
Making these treats at home is not only a fun activity but also a significantly more cost-effective way to enjoy this iconic Disney snack compared to purchasing them at the parks.
Conclusion
Creating your own
mickey rice krispies treats is more than just baking; it's about crafting joy and bringing a piece of Disney magic into your home. With just a few simple ingredients and a dash of enthusiasm, you can transform a classic treat into an enchanting masterpiece. From the initial melting of marshmallows to the final sprinkle of edible glitter, each step is an opportunity to infuse your creation with love and a touch of fantasy. So gather your ingredients, grab your Mickey cookie cutter, and prepare to delight in the delicious, whimsical world of homemade Mickey Mouse Rice Krispies treats!